
Using Floating IPs in practice means that the IP-address is allocated to your cloud project, instead of being directly connected to your instance, which is done if you select “provider1” as a network directly when you create your server. This means that even if you choose to recreate or delete your instance, you can still keep the same IP address (which is convenient if, for example, you have domains that point to it or the like). It also allows you to move an IP address easily between different instances.
How do I begin?
To use Floating IPs, you must first set up a private network in your account. You can read about how to do this in this guide.
Once you have configured your network, you are ready to allocate IP addresses to your project and connect them to a specific port on your network.
- Start by going to your cloud portal and “Floating IPs”.
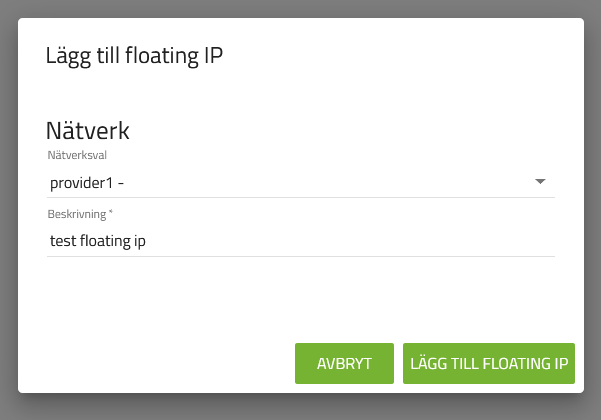
- Here you click on the green + button at the bottom right, and select “provider1” as the network, you also need to enter a description for the IP address. Then press “Add floating IP” and the IP address will now be allocated to your project.
- You now have the option of allocating this IP address to one of your instances, provided they have at least one port connected to a private network (which in turn is connected to a router connected to “provider1”). To do this, click on the instance, and go to the “Network” tab.
- Here you click the “Allocate ip” button, and you can then choose your floating ip, and which port you want to connect the ip address to. If there are no free ports, select “Add port” and create a port on the network you want to use.
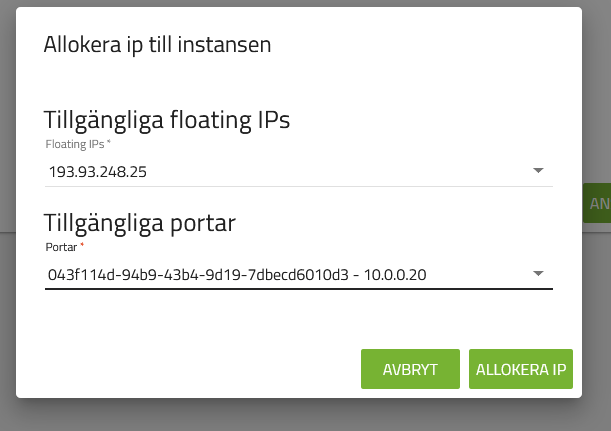
- Then click on “Allocate IP” and your IP address will now be connected to the port you selected.
